Wednesday, March 9, 2016

Guest room closet organization

One of the final frontiers for organization in my own home is my guest room closet.  It's a catch-all spot to store girlie accessories (handbags, pashminas, scarves), as well as wrapping paper, our vacuum cleaner and other odds & sods.  The old hanging organizer (SKUBB from IKEA) wasn't adequate for the weight and volume of items I needed to store.

SOLUTION:
I found a used an IKEA KALLAX (1 x 5) shelving unit on Craigslist for $45.  I bought some inexpensive canvas baskets new from IKEA to go with the unit, along with a dual drawer insert accessory designed to fit inside one of the KALLAX cubes.  From inside the closet itself, I removed the installed hanging rod, shelf, and shelf ledges.  I patched the holes, then painted the inside of the closet.  The hanging rod and shelf were cut to fit between the wall and the shelf unit.  I installed an IKEA TJUSIG hook bar for added storage, but it also doubles as the shelf ledge on the wall side.  Total cost: $100

Before


Friday, January 17, 2014

The Trifecta of Home Organization

The Trifecta of Home Organization
by Heather Fulcher - Professional Organizer for Hire


Step 1 – Have less stuff
The majority of us have too much stuff in our homes.  The first step to improving your organization is to purge unwanted items. Each and everything in your home needs to earn its real estate. You should either LOVE or have an immediate purpose for the majority of your belongings. The overall volume of belongings should be appropriate and proportional to the amount of space in your home.

Step 2 – Create organization systems
    “A place for everything, and everything in it’s place” - Ensure that everything has a place to live, ideally in a closed storage system (closet, cabinet, drawer).
    Sustainable systems – a sustainable organizing system is one that can easily be maintained by all of the residents of the house.  An organization system that stands the test of everyday use is one where form follows function.  Pretty or cool looking systems won’t be sustainable unless they perform the function required.
    "I can't afford this!" - Systems don’t have to cost much, by being creative and resourceful, you can use what you already have such as shoe boxes, and old yogurt containers.
Some examples of organization systems:
·    Containerize and label – you can use baskets, bins, jars, boxes, bowls, etc.
·    Install a closet organization system
·    Use a filing cabinet and create a filing system for your documents
·    Buy the necessary furniture (cabinet, dresser, filing cabinet, shelving) to organize and store your belongings so that everything has a home, and can be appropriately accessed.
·    Store your high-use belongings so they are at hand and easy to access, and ensure seasonal or low-use items are using up less accessible storage areas.


Step 3 – Habits
“Getting organized” is a task.  “Being organized” is a habit. An organized house will stay organized if the residents are in the habit of putting things back to where they belong. Ensure each member of the family is accountable towards the common goal of an organized house.

Examples of habits of organized people:
·     Less is more – organized people critically review belongings as a part of everyday life, and are constantly purging
·     One-in/One-out rule – when you buy a new pair of shoes, an old pair needs to be donated.  With the exception of consumables such as food, toiletries, unless there is an equal amount of stuff leaving the house as is entering the house, you will begin to accumulate an overabundance of belongings in your home.
·      Process your mail as soon as it comes in.  Read it, action it, then file it away.  Pin it to the bulletin board if is a work in progress.
·      Hang your coat in the closet every time you come home.
·      Fold and put away your laundry as soon as it comes out of the dryer.
·      Wash and put away your dishes after dinner each night.
·      Put the vacuum away when you are finished with it.

Strategies to developing and maintaining organizing habits:
  • Garbage management – get in the habit of putting things into the garbage can or recycling bin immediately.  Have garbage cans placed conveniently throughout your space, and empty them when they are full.
  • Task lists or assigned zones may help younger children develop organization habits. Reward the positive habits with money or privileges. Hold children accountable by confiscating belongings that are not put away, returning it if they perform a chore. 
photo credit: www.positiveparentingconnection.net
Blog post by Heather Fulcher
Professional Organizer for Hire
Vancouver, BC, Canada
heatherfulcher@gmail.com
604-618-4829

Monday, December 9, 2013

Pantry organizing with mason jars

One of the easiest and cheapest ways to containerize an unruly and disorganized kitchen pantry is with the use of mason jars.

Jar size and style
 I recommend using wide mouth mason jars for ease of filling and dispensing. Choose mason jars that are appropriate in size for the items you are storing and for the package size quantity that you typically purchase the product.  I purchase quite a few pantry staple products in bulk, so when I replenish my jars, I only buy the amount that I need.

Labelling
I recommend a consistent labelling style so your pantry looks neat and orderly.  Maybe that's just the organizer in me talking. You can hand print on the labels that are included with the mason jar kit.  Another suggestion is to use a label maker.  Depending on where you are storing your jars, it might be easier to label the top of the jars so you can find jars easily at a top glance. Top labels can easily be made with your computer and home printer.  Type the label words (ie. Rice Flour) into a Word document and align centre the text.  Select the font style you like, and select the font size that will fit in the round sealing cap under the mason jar screw ring. Once printed, cut the paper slightly smaller that the sealing ring, and then insert the paper between the round sealing cap under the screw ring. You can laminate the paper for longer life if you like.

This is a photo of my own pantry shelf where I use mason jars to organize my dry goods.  I use top labels because  I see the lids more than I see the front of the jars.


Client project photos

This client was looking to organize her pantry shelves in an open concept kitchen.  The storage solution needed to be functional as well as attractive since it's on display in her home.

Before: all the spices and dry packaged ingredients were stored in large bins on the pantry shelf. Very inefficient to find what you want quickly, and difficult to know what you have before going to buy more, and not terribly attract to look at.

Before

In progress - the first task is to sort your items. Categorize, find multiples and estimate the size of containers required to store your ingredients.

After: Small (125ml/250ml) jars were used for spices and larger jars (500ml/750ml) were used to store other dry goods such as cornmeal, specialty flours, beans, rice, quinoa, nuts, etc.

After


Blog post by:
Heather Fulcher
Professional Organizer for Hire
Vancouver, BC, Canada
heatherfulcher@gmail.com
604-618-4829


Monday, August 19, 2013

Organizing the tools in the garden shed

We are very limited with the amount of storage space in our house since we don't have a garage, so we need to make maximum usage of the space in our tiny little garden shed.  To date, many of our tools were stored in stacked rubbermaid bins.  I tried to find an off-the-rack shelf unit 2'x2'x5', but wasn't able to find exactly what I needed.  So we decided to make a custom shelf unit to fit exactly in our space, and to fit exactly the stuff we needed to store.  We used 2"x2" for the posts and 1" x 2" for the side bracing.  We bought 3/8" plywood for the shelves and had it cut at the hardware store to 24" squares for the shelves.  Then Rich notched out the corners of the plywood shelves to fit around the posts.  The total cost for the project was $50 and it took the two of us about 2 hours to build it.
Before

Before


Blog post by Heather Fulcher
Professional Organizer for Hire
Vancouver, BC, Canada
heatherfulcher@gmail.com
604-618-4829

Tuesday, May 21, 2013

Organize a garage sale


Having a garage sale is a great way to kick start a clutter purge. Here are some steps and tips for a successful sale.
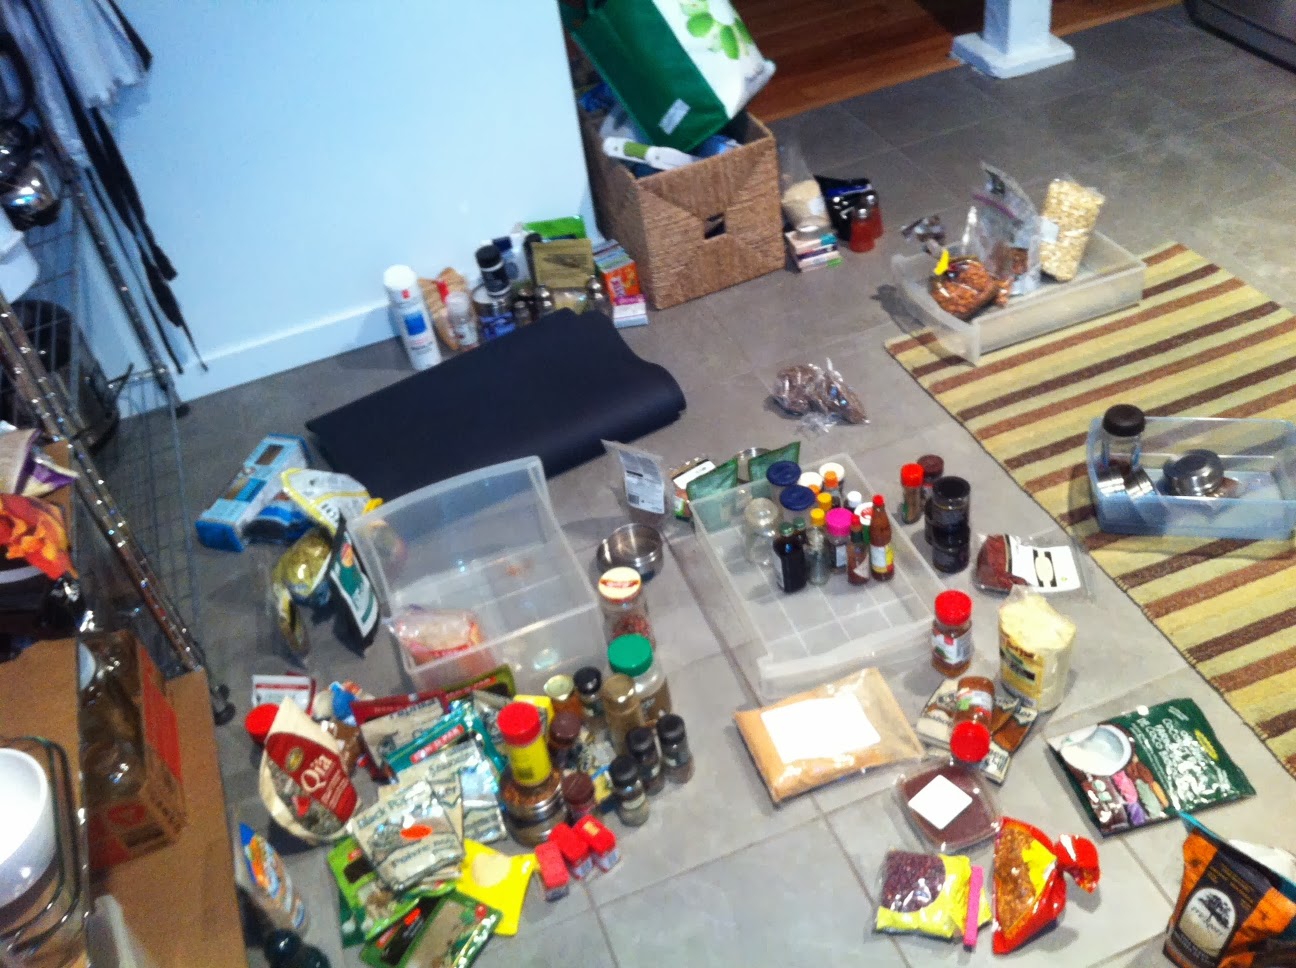
  1. Gather the stuff
-       Use a staging area (such as guest room, dining room, garage, basement) to gather the items for sale.
-       Your garage sale inventory should consist of general household items, clothing, books, kids stuff, hobby supplies, low priced furniture, home decor, garden equipment, board games, recreational equipment, etc.  Separate out belongings that are highly specialized and unlikely to appeal to the general public.


  1. Research
-       Garage Sale, Craigslist OR EBAY. If you have any collectables or rare items for sale, research the value and decide if the garage sale is the best marketplace to sell these.  Craigslist is a good marketplace for bulky items with value that are best sold locally.  Ebay is the best marketplace for rare, specialized or collectable items that are reasonably easy to ship.  The Ebay auction format is likely to yield the highest possible market value for the rare or specialized item
-       Does your city require a permit? Call your municipality to find out.
-       Are there sign regulations? Check with your municipality.

  1. Sort items in staging area, putting similar items together.
    1. Board games
    2. Kitchen items
    3. Hobby supplies
    4. Garden equipment
    5. Camping equipment
    6. Clothing (separate out by size, ie. Girls size 4, Boys size 8, etc. Ladies size 6, Mens size XL).
    7. Baby items
    8. Housewares
    9. Décor

  1. Set the date
-       Saturday or Sunday are best.  Choose one day only, because all the good stuff is normally sold in the first few hours of day 1 and customers know this.
-       Avoid holiday long weekends.
-       Choose a start time that is consistent with start times with other garage sales in the area – usually 8am or 9am.  Die hard garage salers plan their route to visit all the sales in the neighbourhood first thing in the morning.  12noon start is not recommended for this reason.
-       Plan an end time early in the afternoon, ie. 1 or 2pm 
-       Have a plan B date incase you decide to cancel due to weather.

  1. Exit strategy
-       Some ideas to accelerate sales towards the end of the day:
a.     Half price items after 11am
b.     $1/bag after 12pm
c.     Free items during pack-up at 1pm
-       Call your favourite charity in advance, and arrange pick-up of all unsold items at the end of the sale.
-       Alternatively, load up your vehicle with the unsold items and drop it off at your local charity, thrift store or shelter. Make sure you research in advance what items each facility accepts and would find useful.

  1. Pricing
-       If the goal is to get the BEST price for your item, try selling it in a different marketplace (Craigslist, Ebay, antique consignment, etc).  If your goal is to get rid of it, then sell it in a garage sale.
-       What price should you ask for your items?  Consider what you would pay at a garage sale for this item.  The general rule of thumb is 1/3 of retail (MAX).  This doesn’t always apply however.  You may have spent $20 on a souvenir ball cap from the Grand Canyon, but you’ll probably only get $1 for it at the garage sale.
-       Price EVERYTHING!  Buyers are more apt to buy if they know the price is in their ballpark.  It’s OK to tag an item “Make me an offer”, and bundle all kitchen gadgets in a bin marked “$1 each”. 
-       Prepare to negotiate the price, it’s the name of the game, and it is part of what makes garage sales fun.  Build in a small buffer to your asking prices, and prepare to give buyers bulk pricing if they are buying multiple items.
-       Know your pricing and don’t overprice. Garage salers are looking for bargains, and they know the going prices for things.  Remember, the goal is to get rid of stuff.
-       Write “FIRM” on a price ticket for items if that is your bottom price.

  1. Give back
-       Consider donating a percentage (or all?) of the proceeds of the sale to a charity.  Advertise this in your online postings and with a big sign onsite on event day. It’s a great way to give back in your community or to your favourite cause. 
-       People are happy to pay full price if they know some proceeds are going to charity.
-       Include an extra donation jar by the cash table for people to give some extra coins, and for people that browse but don’t buy.
-       FOLLOW THROUGH – it’s important to make the promised donation shortly after the garage sale ends, and proceeds are calculated.

  1. ADVERTISE
The success of your sale rides almost exclusively on this step. If you don’t have customers, you won’t make many sales. Invest some time and a little bit of money on the marketing of your event.
-       Craigslist – post for free on Craigslist and Kijiji.
-       Facebook and Twitter - Social media is another great FREE way to get the word out.
-       Your online listing should include the Date, Start time/End time, Address/City, and a brief description of items. Photos of the sale items in set-up mode.  Include photos of any large ticket items (furniture, electronics, home gym equipment, etc).
-       Prepare neighbourhood signs well in advance of event day.  Your poster signs should include: GARAGE SALE, Date, Start/end time, address and directional arrow. Do not include any other information on the poster signs. Send a helper to post them throughout the neighbourhood EARLY in the morning of event day.  Prepare in advance where all the signs should be placed and send your helper with a map with sign location instructions.  See my separate post on the dos and donts of garage sale signage.  I have some strong feelings on the topic of garage sale signage.  All of the effort you put into the preparation of the sale can be lost if your signage is poor.

  1. Check list before event day
-       Newspaper for wrapping breakables
-       Grocery bags
-       Stickers for pricing (or use painters / low tack tape
-       Sharpies/Pens/Markers
-       Hangers & clothes rack / clothes line
-       Boxes for sorting or grouping
-       Calculator
-       Tape measure
-       Extension cord to plug in electronics for testing
-       Schedule some helpers
-       Float - ensure you have a selection of small bills and coins to make change
-       Garage sale signs are prepared and ready to be installed around the neighbourhood.

  1. Setting up on event day
-       Get everything sorted, prepped and priced prior to event day.  Lay everything out for easy set-up the morning of your sale. 
-       Set-up in your garage, car port, yard and/or driveway. Make sure people can see the sale from the road.  If they can’t, place a few large items visible from the road.  Add balloons and/or large colourful signage to mark the spot.
-       Remove or cover non-sale items in the sale area.
-       Use fold-up tables or plywood on sawhorse stands for display. Try to display as many of the items as possible, customers won’t always spend the time to dig to the bottom of boxes to find out what you are selling.
-       Hang clothes as much as possible.  Use a rope strung between trees, or portable clothes rack.
-       Display books with spine out/up.
-       Label items that are unclear ie. King sized sheet set, accessories for certain brand of electronic device.

  1. Make it fun
-       Music -  pick a selection that is likely to appeal to the general public, and don’t play it too loud.
-       Theme – consider having all the merchants (all family members, or point person for each area if having a multi-family sale) dress in a theme costume, so customers know who to pay or ask questions to.
a.     Hawaiian grass skirt/Hawaiian shirt
b.     Crazy hats
-       Concession – such as kids selling lemonade & cookies and/or free ice water and coffee.
-       Free stuff – put your broken, unmatched, incomplete items in a FREE box.  Such as single earring, chipped mug, puzzle with missing pieces, etc. If someone can use these items for crafting or repurposing, it’s better to give them for free than send them to the landfill.

  1. Be safe
-       Lock the doors to your house during the sale. 
-       Don’t let anyone in to try on clothes or use the washroom inside.
-       Place valueable items close to the house or cash desk to ensure supervison.
-       Don’t take personal cheques
-       Ensure cash is kept safe – use a fanny pack or apron with pockets.  Don’t leave cash box unattended

  1. At the end
-       Pack up and dispose (donate?) unsold items.
-       Take down neighbourhood signs

Brought to you by:
Heather Fulcher
Professional Organizer for Hire
Vancouver, BC, Canada
heatherfulcher@gmail.com
604-618-4829


Monday, April 29, 2013

When should I hire a professional organizer?


When should I hire a professional organizer?
  • When time is money – with the help of a professional organizer, you can tackle the clutter in less time than you would spend on your own.
  • When you are chronically disorganized and it’s the last task on your list.
  • When disorganization is causing stress in your relationships or difficulty in your home life.
  • When you are physically limited in how much you can lift or move.
  • When the project is overwhelming, and you don’t know where to start.
  • When facing a deadline such as a move date.
  • When you just need HELP!

Common projects for professional organizers
Pre-move
In preparation for a move, many people take the opportunity to review and purge belongings.  This is a daunting task for many people, especially if the move date is fast approaching. A professional organizer can help you sort, purge, organize and pack-up your belongings in preparation for your move.

Post-move
Settling back into a new space (or recently renovated space) is a wonderful opportunity to revisit organizational techniques.  A professional organizer can help design organizational system customized to your needs and specific to the parameters of your new space.

Downsizing
When it’s time to move to a smaller home or condo, a professional organizer can help scale down the amount of belongings appropriate for the new space.  Your organizer can also help distribute treasures to assigned beneficiaries (family/friends), or sell collectables and valuables.

Home staging
The way you live in your home is very different from the way you showcase your property for sale or rent. A professional organizer can help ensure your property is presented with the highest perceived value and to the largest possible audience.  An organized home suggests the property is well maintained and has sufficient storage.  It allows buyers to focus on the positive features of the property.

De-cluttering
Clutter has magnetic qualities, a few things turn into a pile of things very quickly. A professional organizer can help you critically review your belongings and sort into categories: keep, gift it, sell, recycle, donate, garbage. Once sorted and purged, next comes organization techniques. Each client, project and space is unique; a professional organizer can help create storage and organization tools to solve any challenge.

Blog post by:
Heather Fulcher
Professional Organizer for Hire
Vancouver, BC, Canada
heatherfulcher@gmail.com
Tel: 604-618-4829


Friday, April 26, 2013

Tour of my kitchen cabinets


As a professional organizer, I realize my space is a bit more organized than the average person.  Do you know anyone that would like help getting their kitchen cupboards to look like mine?  As a professional organizer, I'm here to help.

Heather Fulcher
Professional Organizer for Hire
Vancouver, BC, Canada
heatherfulcher@gmail.com
604-618-4829